Showing posts with label the. Show all posts
Showing posts with label the. Show all posts
Thursday, February 27, 2014
Electronic Circuits for the Evil Genius 2nd Edition 64 Lessons
WE CASUALLY ACCEPT ELECTRONICS in our everyday world. Those who don’t understand how it works are casually obedient. Those who take the time to learn electronics are viewed as geniuses. Do you want to learn how to control the power of electronics? This text provides a solid introduction to the field of electronics, both analog and digital. Electronic Circuits for the Evil Genius is based on practical projects that exercise the genius that exists in all of us. Download ebook for full details and articles.
 File Type: PDF
File Size:15MB
Total Pages: 321
PART ONE Components
File Type: PDFFile Size:15MB
Total Pages: 321
PART ONE Components
- Components
- Resist If You Must
- More Components and Semiconductors
- Two Projects and Then Some More
PART TWO Introduction to Digital Electronics
- Digital Logic
- The First NAND Gate Circuit
- Analog Switches for Digital Circuits
- The NAND Gate Oscillator
- How Do We Understand What We Can’t See? .
- Digital Logic Project
PART THREE Counting Systems in Electronics
- Introducing an Analog-to-Digital Converter
- The 4017 Walking Ring Counter
- Running a Seven-Segment Display
- Define, Models, and Make Your Own Project
PART FOUR Amplifiers: What They Are and How to Use Them
- What Is an Amplifier?
- Exploring the Op Amp
- Applying the Op Amp: Building the Intercom
- Prototype and Models: Patience Has Its Rewards
PART FIVE Appendices
- Common Component Packaging
- Capacitors: Reading and Decoding
- Animations List
- Glossary.
- Make Your Own Printed Circuit Boards

Friday, February 7, 2014
Led Flasher with the LM3909 IC streampowers
The LM3909 is an integrated circuit (IC) which will flash a light-emitting diode (LED). Using only two extra components and a battery, the circuit is cheap and has a very low current drain from a 1.5 V cell.
The circuit can be used as a novelty flasher, an indicator for a dummy alarm bell box, or it could be attached to a torch so that it could be found easily in the dark! The simple circuit
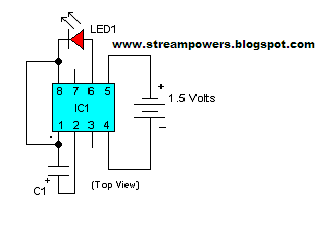
Led Flasher with the LM3909 IC Diagram
Assembly
The circuit can be built on a small piece of Veroboard (the piece shown in Figure 2 measures 15 holes by 10 strips). Using such a board, follow these instructions.
1. Depending on how far away you want the LED from the circuit board, solder a length of insulated wire to each lead of the LED. Use different colours of insulation – say, red and black, connecting the red lead to the anode (a) lead (the longer one) of the LED, and the black one to the cathode (k). Figure 2 shows these leads.
2. Cut the copper tracks as shown in Figure 2, using a 3 mm (1⁄8 inch) diameter drill, rotated between thumb and forefinger, or use the proper tool. Make absolutely sure that the tracks are completely broken!
3. Fit the IC holder in the correct position, using the cut tracks as guides, and make sure the small notch is facing towards the top of the board. Solder the pins to the copper tracks.
4. Mount the capacitor, positive end to the left, so that the positive lead is soldered to track F, which connects it to pin 2 of the IC; the negative lead is soldered to the right-hand side of track E, this being connected to pin 8 of the IC.
5. Solder on the battery leads, positive to the right, and the extended LED leads, positive downwards.
6. Check the circuit, and hold up the board to a bright light and look carefully for solder bridges between the tracks and pieces of copper swarf which may have escaped your inspection in 2 above! Remove whatever you find.
7. When all seems well, put the IC into the socket, ensuring that the notch or dot on the upper surface of the IC lines up with the notch on the holder. Line up each pin on the IC with the hole below it before pressing gently on the IC with the board supported on a firm surface.
8. Connect the battery; the LED should start to flash. The circuit is complete and working!
If you prefer, the whole circuit (battery included) can be mounted in a small plastic box, with the LED mounted on a clip and protruding through the panel. There are many other possibilities, and it is up to you to find an application for your own use.
Parts list
LM3909 Integrated circuit
IC socket 8-pin DIL BL17T
LED 5 mm diameter WL27E
100 microfarad (#F) Electrolytic capacitor (10 V) FB48C
Battery holder For AA-size cell YR59P
Battery 1.5 V AA cell
Small piece of Veroboard (15 holes by 10 strips)
Small plastic box (if required)
LED clip (if required)
Two lengths of coloured, insulated wire for LED (as required)
Subscribe to:
Posts (Atom)